
Adding the Custom Controller to the Website
Adding the Custom Controller to the Website
Using custom skins with Flash Player is similar to using default skins. However, you have to edit some HTML code manually and copy your custom skin SWF files into the correct folders so you can reference them.
- Open the cows/video01.html file in Dreamweaver 8.
- Select Insert > Media > Flash Video from the main menu.
- Make sure that the Video type pop-up menu is set to Progressive Download Video, and click the Browse button next to the URL text box. Navigate to the videos folder within the Farm site and select the file cow01.flv.
- Your custom skin is not visible in the Skin pop-up menu. Select the Clear Skin 1 skin from this menu. You manually copy your custom skin file into the appropriate folders in an upcoming step.
- Select any of the other options (follow the first exercise for guidance, if necessary).
- Deselect the Prompt users to download Flash Player if necessary check box to stop Dreamweaver from embedding the Flash Player detection code.
- Click OK so Dreamweaver generates and inserts the required HTML code into the document.
- Navigate to the cows directory using Windows Explorer (Windows) or the Finder (Mac). You now see two new files called Clear_Skin_1.swf and FLVPlayer_Progressive.swf. Copy the farmSkin_small.swf and farmSkin_large.swf files (the files that Flash creates when you publish the skin files) and paste them into the cows folder.
-
In Dreamweaver, switch to Code view or Split view and locate the following lines of code:
<object classid="clsid:D27CDB6E-AE6D-11cf-96B8-444553540000"
  codebase="http://download.macromedia.com/pub/shockwave/cabs/
  flash/swflash.cab#version=7,0,0,0" width="160" height="120"
  id="FLVPlayer">
   <param name="movie" value="FLVPlayer_Progressive.swf" />
   <param name="salign" value="lt" />
   <param name="quality" value="high" />
   <param name="scale" value="noscale" />
   <param name="FlashVars" value=" &MM_ComponentVersion=
     1&skinName=Clear_Skin_1&streamName=../videos/cow01&autoPlay=
     false&autoRewind=false" />

  <embed src="FLVPlayer_Progressive.swf"
    flashvars=" &MM_ComponentVersion=1&skinName=
    Clear_Skin_1&streamName=../videos/cow01&autoPlay=
    false&autoRewind=false" quality="high" scale="noscale"
    width="160" height="120" name="FLVPlayer" salign="LT"
    type="application/x-shockwave-flash"
    pluginspage="http://www.macromedia.com/go/getflashplayer" />
          </object>
Replace the previous line of codes with the following snippet:
codebase="http://download.macromedia.com/pub/shockwave/
   cabs/flash/swflash.cab#version=7,0,0,0" width="180"
   height="167" id="FLVPlayer">
   <param name="movie" value="FLVPlayer_Progressive.swf" />
   <param name="salign" value="lt" />
   <param name="quality" value="high" />
   <param name="scale" value="noscale" />
   <param name="FlashVars" value=" &MM_ComponentVersion=1&skinName=
    farmSkin_small&streamName=../videos/cow01&autoPlay=
    false&autoRewind=false" />
   <embed src="FLVPlayer_Progressive.swf" flashvars
    =" &MM_ComponentVersion=1&skinName=farmSkin_small&streamName
    =../videos/cow01&autoPlay=false&autoRewind=false"
    quality="high" scale="noscale" width="180" height="167"
    name="FLVPlayer" salign="LT" type="application/x-shockwave-flash"
    pluginspage="http://www.macromedia.com/go/getflashplayer" />
 </object>
The first cow video is 160 pixels wide by 120 pixels high, so you need to use the smaller skin. Because you put the skin in the same folder as the default skin you chose earlier, you don’t need to modify the path at all. However, you need to modify the
widthandheightparameters for both the object and embed tags because the custom skin is slightly larger than theclearSkin_1 skin.Note: The dimensions of the Flash document increased from 160 x 120 pixels to 180 x 167 pixels. Remember that in both the large and small skins you added a line of code similar to the following:
res.video = {x:10, y:10, w:-20, h:-47};So you can calculate the new dimensions that the embedded Flash file needs to be by adding 20 pixels width (taken from the
-20in the code snippet above) and adding 47 pixels height (taken from the-47in the code snippet above). Therefore the 160 x 120 pixel video needs to be at least 180 x 167 pixels when you factor in the additional size that’s required to display the custom skin.
Warning: If you notice a small gap between the Flash video and the skin itself, it might be necessary to increase the width or height properties in both the object and embed tags in the HTML code.
-
Save the video01.html file and press F12 to view the video in the default browser. Your video should now display within your custom skin.
Note: If you cannot see the video embedded in your page, and you are testing your files on a remote server, it might be necessary to upload your files to your web server. In Dreamweaver, switch to either Design view or Split view and click the Flash Video instance. In the Property inspector, you can modify the properties for the specific Flash Video instance. Click the Show required fields text link at the bottom of the Property inspector, and Dreamweaver displays a dialog box that lists the files you need to upload to your web server. Remember that you’ll also need to upload your custom skins to the web server. The custom skins need to be in the same directory as the current HTML file.
-
Repeat steps 1 through 8 on video02.html in the cows folder, but set the
skinNameargument tofarmSkin_largeand set theURLargument tocow02.flv. Remember to increase the dimensions of the embedded Flash video to add 20 pixels width and 47 pixels height.Press F12 to review the website in your default browser. Notice that the first video displays the custom small skin file with only a play button, seek bar, and mute button (see Figure 5). When you click the play button, it “disappears” and turns into a pause button. If you click the second video link, the larger skin is displayed, revealing a play, pause, and stop button in addition to a seek bar, mute button, and volume slider.
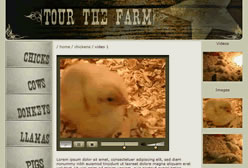
Figure 5. The finished video is inserted into your website with a custom controller, which matches the rest of the website.
- Continue embedding videos for the remaining animals using the Flash Video component.
Comments