
Add materials
Add materials
To accentuate parts of the model and make it appear more lifelike in documentation, use the materials and textures included with Acrobat 3D Toolkit.
1 Click one tire in the viewport, then Ctrl-click the other to add it to the selection.
2 Click the Folders button to reveal the Folders panel, and then click the Materials tab.

Click the Generate Thumbnails button or press the F4 key to generate the thumbnails. You need to do this procedure only once to preview all of the materials supplied with Acrobat 3D.
3 Locate the Rubbermat.rhm material, and drag it to one of the highlighted tires. Both tires change to the black rubber appearance.
4 Add other materials to as many of the visible parts as you choose.
Reduce the number of polygons
When the appearance of the model is as desired, the next step is to maximize the efficiency of the file by reducing complex CAD data to decrease file size, without losing the visual integrity of the models.
1 Select both tires and look at the data in the Information Bar above the Scene Tree. This area tells you how many objects are selected and how many vertices and faces they have.
2 Choose View > Controls And Toolbars, and ensure that the Display and CAD Tools toolbars are active.
3 In the Display toolbar, click the Wireframe button to display all of the polygons.
4 In the CAD Tools toolbar, click the Reduce Model button , and then click Process in the Reduce Model dialog box.
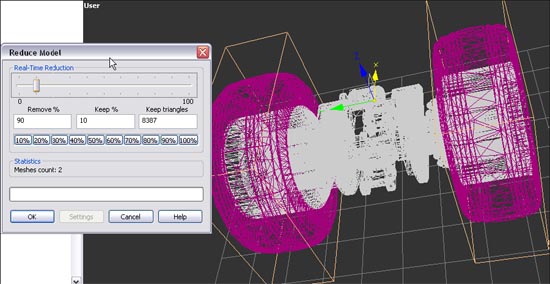
Use the Real-Time Reduction slider to visually track the changes in polygons before you commit to them.
5 Move the Real-Time Reduction slider to the left until the Keep % setting displays 10, and note how the display in the viewport updates in real time.
6 Click the Solid button in the CAD Tools toolbar to change the render mode and examine the model in the viewport.
7 Adjust the Real-Time Reduction slider to a Keep % setting of 30 and note the difference in appearance.
8 Click OK to accept the change, and then save and close the model.
Comments