
Randomizing Your Animations With The Wiggler in AE 5.5
| Article Focus: One of the problems that may plague animators is that their animation is too perfect ~ too clean. In this article, Jim Tierney demonstrates how to add in a little randomness to your animation with the Wiggler tool in After Effects 5.5. |
| Download | stuffit project file | zipped project file |
| One of the problems that many animations have is that they are too clean. Too smooth. Too perfect.
In real life, things are very rarely, if ever, perfect. There’s always ‘noise’. Noise is that ‘thing’ that breaks up what should be perfect. Whether it’s the dust on a counter top, skips on a CD, the slight shake of a camera, the variation in the gate of someone’s walk, basically just the slight bit of randomness that is in everything around us. 
Noise as we normally see it:
results in something like this: Noise gives us the imperfections and detail that we’re used to seeing in the real world. For the rest of us, integers generally work pretty well. Or at most one decimal place. When was the last time you needed a 1.238678 Gaussian Blur? However, one thing that many animators notice early on is that with this level of precision, their animations look a little too structured. A little too perfect. If I have a bird flying across the screen, I don’t want it to go in an exactly straight line. Birds tend to dip and rise with the air current and don’t generally fly in perfectly straight lines.
So, what to do about all this damn randomness that seems to creep into our daily lives? How do I get that into my animations? Well, you could set multiple keyframes. Set a keyframe every time you think there should be slight jiggle or movement of our camera. This can be very effective, but it tends to be somewhat time consuming. Especially if you need to set a LOT of keyframes. If you want to simulate a lot of shaking, as in earthquake or rough boat ride, you’ll need a keyframe every few frames. Setting all those keyframes is not particularly creative nor fun. Tedious, tedious, tedious. Ugh.
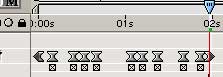
Luckily, After Effects has an easy solution for you. The Wiggler. (there’s also a slightly more difficult version which we’ll go into later) Despite its somewhat comical name, which might be better suited for a horror movie, or, well, some other type of movie (paging Dirk Wiggler… )… it’s a very powerful tool. It allows you to automatically vary the values of your animation. Adding in that randomness that will go a long way to adding that extra bit of realism. The wiggler takes the value of the property at whatever time it’s at, generates a random value, then adds or subtracts that value from the value of the property. The Magnitude parameter in the Wiggler sets min/max amount that can be added to the original value. For example, one common use is to vary a property around a single value. Say you want a blur to usually be 2.0, but you’d like it to sometimes be a bit more than that and sometimes be a bit less. We want the blur to be in a range of 1 to 3. You would set a keyframe at the beginning of your animation and at the end for 2.0. Then you set your Magnitude for 1.0. 2.0 plus or minus 1.0 gives you a range of 1.0 to 3.0. Why animate from 2.0 to 2.0? Well that means that all the way across your animation the value will be 2.0. The Wiggler will start with 2.0 and whatever random value it comes up with, it’ll add/subtract from 2.0. In the below example, frames 2 through 6 will have a value between 1 and 3 when wiggled. Which value? Who knows? It’s random! That’s half the fun of it! Guess the value and win a prize… picka number ‘tween one and three… any number! I’m sure most of you would guess 1.8347032. All right, all right, so there’s no way to make math fun.
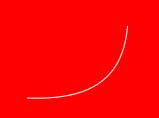
We’re going to go through two exercises. The first will show you how to easily add some shake to your camera or image. It’s pretty easy to simulate an earthquake with the Wiggler and we’ll do that here. Second, we’ll turn a nice smooth line into a chaotic scribble. Virtual pre-school right here and now. Lesson 1:
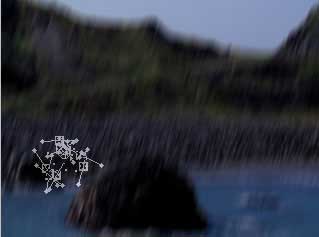
Some serious shakin’ going on! You can see the motion path of the position point in the lower left corner.
But Wait! There’s more! The Wiggler is great and very easy to use. But it’s a little limited and it requires that you have the production bundle version of After Effects. There’s a more powerful way to wiggle that you can use even in the standard version of After Effects. The downside is that it’s an expression and people seem to be afraid of expressions because they think they’re all math. It’s not true! Go through a few tutorials on expressions and see how easy they can be. Maybe not quite as easy as the Wiggler palette, but you don’t need to be a rocket scientist or other unappreciated genius to use them. Take a look at the Wiggly Lines- Expression Comp. This will give you a good example of how expressions are used in a regular project. Notice that we’ve applied a filter called Point Control to the Wiggly Lines layer. The Point Control filter is part of the Expressions Control filter set you’ll find in your Effect menu. These filters do nothing but provide a value for an expression to sample from. Essentially dummy filters. Since you can’t have keyframes and expressions for the same parameter, sometimes you need a dummy filter to have the keyframes, so your effect filter can work with expressions. Notice that the Brush Position has an expression that points to the Position value of the Point Control filter. The Point Control Position is then wiggled, resulting in the same wiggly line that we got with the Wiggler animation assistant. Expressions, unfortunately, are a little out of the scope of this tutorial, but take a look in the AE manual and elsewhere and learn to love the ‘wiggle’ expression. It’ll give you all the power of the Wiggler palette and a whole lot more. The AE online help pages that you’ll find by using the Help menu in AE, is an excellent resource for expressions.
|
 added to this

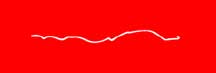
 Not too tough… but imagine 30 sec. of it!


Comments