
Photoshop Elements 2 Pattern Stamp
Photoshop Elements 2 Pattern Stamp |
|
|
|
|
| Used for painting with patterns |
|
  |
Find the pattern stamp by clicking, and holding down the mouse button on the clone stamp icon. Choose the pattern stamp from the pop-up menu that appears. You can use the preset patterns found in the tool’s options bar, or you can create your own pattern. To make your own, you must first make a rectangular selection and define it as a pattern. With the rectangular marquee tool, select an area in any open image to use as the pattern. Note that the selection (pattern) source image, and destination image must be in the same color mode. With the selection active, choose Edit > Define Pattern. Your new pattern will appear in the pattern pop-up menu in the tool’s options bar. 
It is best to save your custom patterns in their own set. To do this choose Edit > Preset Manager. Choose Patterns from the menu, and then click and Shift-click to select all the patterns that you want to include in your set. Click on the Save Set button and name your custom set. After closing and reopening Photoshop, your set will appear in the patterns pop-up palette menu. Dragging in the image with this tool will paint a repeating copy of the selected pattern. A shortcut for changing brush sizes while using this tool is to press the left bracket [ to decrease brush size, and the right bracket ] to choose a larger brush. When editing an image with any tool that uses brushes, you can right-click on the image and the brushes pop-up palette will appear next to your cursor. Press Enter or click on your document’s blue title bar to close the pop-up palette after choosing a brush. The keyboard shortcut for the stamp tools is the letter S. Press the Shift key with the shortcut letter to toggle to the desired stamp. |
|
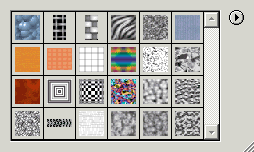
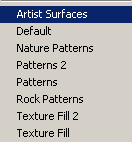
The illustration below is the pattern stamp tool’s options bar (split in two because it’s so long). To choose a brush size, and type, click on the brush stroke thumbnail. A pop-up palette of available brushes will appear. For more information on brushes, please see the Brushes page. The box titled Mode, and showing Normal is a drop down menu of all the blend modes that can be used when applying, or stamping the copied image. The Aligned feature is too hard to explain for the pattern stamp; try it both ways and see for yourself. Opacity determines the transparency, if any, of the stamped pattern. A higher value is more opaque; a lower value is more transparent. You can set this with a slider, accessed by clicking the little arrow to the right of the percentage value. Clicking on the little down arrow next to the blue pattern thumbnail on the options bar will open the patterns pop-up palette, shown in the last below. The palette shown is the Patterns palette (that’s its name). Click on the little arrow in the upper right corner of the pop-up palette to change your palette display to Large List, Small List, or Large Thumbnails. Also in the palette menu, you will find other patterns that you can load, including any custom sets that you have created. New in Elements 2 are some very nice new pattern groups. Be sure and take a look at all of them. Also new in Elements 2 is the Impressionist checkbox on the options bar. Use it to apply your pattern in a manner similar to the Impressionist brush—which is kind of an insane thing to do. |
|
|
|
|
|
If you have doodled with a tool’s options and want to get back to the default settings, click that tool’s icon at the far left end of its options bar. Choose either Reset Tool to reset only the current tool, or Reset All Tools to restore default settings to every tool. Please note that all descriptions, and illustrations featured refer to files which are in Photoshop’s .psd format, and which are in RGB color mode. Other file formats, and color modes may generate different options. Some Photoshop features are not available for images not in .psd format, or RGB color mode. To find what color mode your image is in, choose Image > Mode. |
|
Comments