
PageMaker 7.0 Basics – Using the Pointer Tool with Text
Using the Pointer Tool with Text
When you are working with PageMaker, you will have the flexibility to define your text area. To determine the boundaries and placement of the text, you will be using the Pointer tool.
When you are working with the Pointer tool, you will be working with the text as a block of information. This block can be resized, moved, deleted, copied, and more.
The Pointer tool looks like this ![]()
 Text Blocks
A text block is a portion of a story. A story is text that PageMaker recognizes as a single unit. A story can be one letter or several pages of text and can be contained in a single text block or threaded through many different ones.
In PageMaker, several stories may appear on the same publication page and continue elsewhere in the publication, but each story is a separate unit. When you add or remove text in a story or adjust the size or shape of text blocks that contain part of a threaded story, the text flows through existing text blocks until it gets to the end of the story. If you add text to a threaded story, you may need to adjust the size of the last text block or create a new text block so that all of the text is visible.
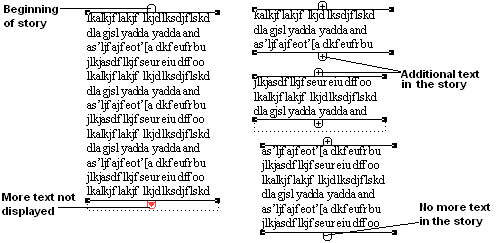
Text Block Indicators
The beginning of a text block is indicated by an open window shade handle at the top of the text block. The end of the text block is indicated by an open window shade handle at the bottom of the text block. A plus sign (+) in the window shade handle indicates there is more text before or after the current portion of the text block. A red triangle ![]() at the bottom of the window shade handle indicates that there is additional text in the text block but it is not showing anywhere in the document. The square boxes on the edges of the window shade are handles that can be used to resize or reshape the text block.
at the bottom of the window shade handle indicates that there is additional text in the text block but it is not showing anywhere in the document. The square boxes on the edges of the window shade are handles that can be used to resize or reshape the text block.

Selecting Text Blocks
When selecting and working with text blocks, you must select the Pointer tool.
Selecting a Single Text Block
-
From the Toolbox, select the Pointer tool
-
Click in the text block
This will select only the current portion of the block.
Selecting Multiple Text Blocks
-
From the Toolbox, select the Pointer tool
-
Click in the text block
-
Hold down the [Shift] key and click each text block
Selecting All Items on a Page
-
From the Toolbox, select the Pointer tool
-
From the Edit menu, select Select All
Now the selected elements can be moved, copied, or deleted as a group.
NOTE: If the story takes up more than one page, this will select only the portion that is on the current page.
Manipulating Text Blocks
Window shade handles can be used to manipulate a text block’s size, shape, and placement on the page. Besides the functions listed here, text bracketed by window shade handles can also be cut or copied.
Placing Additional Text
If a red triangle appears in the bottom window shade handle of a column of text, the computer is indicating that there is additional text that needs to be placed. To place the text:
-
Position the tip of the Pointer tool at the bottom tip of the triangle and click once
If you positioned the pointer correctly, the pointer should turn into a text icon.
-
Position the text flow icon where the text should continue
-
To place the text, click once
Moving Text
-
Click the text block anywhere except in a handle and hold the mouse button down until a four-sided arrow appears
-
Still holding the mouse button, drag the mouse to move the text
-
Release the mouse button when the text is positioned correctly
Deleting Text
-
Using the Pointer tool, select the text block you wish to delete
-
Press the [Delete] key
Only the selected text block will be deleted.
Working with Columns of Text
Shortening or Lengthening a Column of Text
As you adjust the length of columns, no text is being removed or lost. Instead, the layout space is being shortened or lengthened in that particular column. Drag the window shade handles up or down to shorten or lengthen text blocks.
-
Position the tip of the pointer on the window shade handle
-
Click and hold the mouse button
The pointer turns into a double-headed arrow. -
Drag the handle up or down to shorten or lengthen the text column
-
Release the button and the text will reposition itself
Extending Text across Column Boundaries
On some occasions, text needs to extended across two or more columns. For example, an article may be placed on a three-column page, but the title needs to extend across all three columns.
To extend a text block across columns:
-
With the Pointer tool, select the text block
Notice the handles at the ends of the brackets. -
Click one of the handles and hold until the Pointer tool turns into a double-headed arrow
-
Drag the arrow across columns until the block reaches its preferred size and release the mouse button
Comments