
Flash 8 Basics: The Flash Workspace
The Flash Workspace
The following sections provide a detailed introduction to the tools, panels, and other elements of the Flash workspace.
Using the Start Page
Whenever Flash is running with no documents open, the Start page appears. The Start page provides easy access to frequently used actions.
The Start page contains the following four areas:
- Open a Recent Item lets you open your most recent documents. You can also display the Open File dialog box by clicking the Open icon.
- Create New lists Flash file types, such as Flash documents and ActionScript files. You can quickly create a new file by clicking the desired file type in the list.
- Create from Template lists the templates most commonly used to create new Flash documents. You can create a new file by clicking the desired template in the list.
- Extend links to the Macromedia Flash Exchange website, where you can download helper applications for Flash, Flash extensions, and related information.
The Start page also offers quick access to Help resources. You can take a tour of Flash, learn about Flash documentation resources, and find Macromedia Authorized Training facilities.
Tip: You can control whether or not Flash displays the Start page.
To hide the Start page:

- On the Start page, select Don’t Show Again.
To display the Start page again, do one of the following:
- (Windows) Select Edit > Preferences and select Show Start Page in the General category.
- (Macintosh) Select Flash > Preferences and select Show StarPage in the General category.
Using the Stage
The Stage is the rectangular area where you place graphic content, including vector art, text boxes, buttons, imported bitmap graphics or video clips, and so on when creating Flash documents (see Figure 1). The Stage in the Flash authoring environment represents the rectangular space in Flash Player or in a web browser window where your Flash document appears during playback. You can zoom in and out to change the view of the Stage as you work.
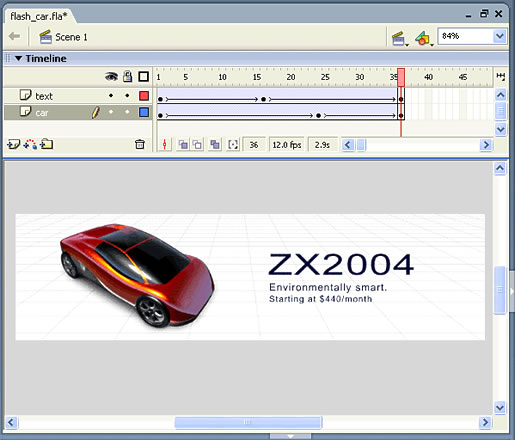
Figure 1. Stage in the Flash authoring environment
The grid, guides, and rulers help you position content precisely on the Stage. For more information, see “Using the Grid, Guides, and Rulers.”
Zooming
To view the entire Stage on the screen, or to view a particular area of your drawing at high magnification, you can change the magnification level. The maximum magnification depends on the resolution of your monitor and the document size. The minimum value for zooming out on the Stage is 8%. The maximum value for zooming in on the Stage is 2000%.
To magnify or reduce your view of the Stage, do one of the following:
-
To zoom in on a certain element, select the Zoom tool in the Tools panel, and click the element (see Figure 2). To switch the Zoom tool between zooming in or out, use the Enlarge or Reduce modifiers (in the options area of the Tools panel when the Zoom tool is selected) or Alt-click (Windows) or Option-click (Macintosh).

Figure 2. Zoom tool options
- To zoom in on a specific area of your drawing, drag a rectangular selection on the Stage with the Zoom tool. Flash sets the magnification level so that the specified rectangle fills the window.
- To zoom in on or out of the entire Stage, select View > Zoom In or View > Zoom Out.
- To zoom in or out by a specified percentage, select View > Magnification, and select a percentage from the submenu or select a percentage from the Zoom control at the upper-right corner of the Timeline.
- To scale the Stage so it fits completely in the application window, select View > Magnification > Fit in Window.
- To display the contents of the current frame, select View > Magnification > Show All, or select Show All from the Zoom control at the upper-right side of the application window. If the scene is empty, the entire Stage appears.
- To display the entire Stage, select View > Magnification > Show Frame or select Show Frame from the Zoom control at the upper-right corner of the Timeline.
- To display the workspace surrounding the Stage, select View > Work Area. The work area is shown in light gray. Use the Work Area command to view elements in a scene that are partly or completely outside of the Stage area. For example, to have a bird fly into a frame, you would initially position the bird outside of the Stage in the work area and then animate it into the Stage area.
Moving the View of the Stage
When the Stage is magnified, you may not be able to see all of it. The Hand tool lets you move the Stage to change the view without having to change the magnification.
To move the Stage view:
- In the Tools panel, select the Hand tool. To temporarily switch between another tool and the Hand tool, hold down the Spacebar and click the tool in the Tools panel.
- Drag the Stage.
Using the Timeline
The Timeline organizes and controls a document’s content over time in layers and frames. Like films, Flash documents divide lengths of time into frames. Layers are like multiple film strips stacked on top of one another, each containing a different image that appears on the Stage. The major components of the Timeline are layers, frames, and the playhead (see Figure 3).
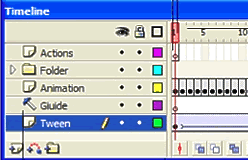
Figure 3. Timeline in Flash
Layers in a document are listed in a column on the left side of the Timeline. Frames contained in each layer appear in a row to the right of the layer name. The Timeline header at the top of the Timeline indicates frame numbers. The playhead indicates the current frame displayed on the Stage. As a Flash document plays, the playhead moves from left to right through the Timeline.
The Timeline status display at the bottom of the Timeline indicates the selected frame number, the current frame rate, and the elapsed time to the current frame.
Note: When an animation is played, the actual frame rate is displayed; this may differ from the document’s frame rate setting if the computer can’t calculate and display the animation quickly enough.
You can change the way frames are displayed in the Timeline, as well as display thumbnails of frame content in the Timeline. The Timeline shows where there is animation in a document, including frame-by-frame animation, tweened animation, and motion paths. For more information on animation, see “Creating Motion.”
Controls in the layers section of the Timeline let you hide, show, lock, or unlock layers, as well as display layer contents as outlines. For more information, see “Editing Layers and Layer Folders.”
You can insert, delete, select, and move frames in the Timeline. You can also drag frames to a new location on the same layer or to a different layer. For more information, see “Working with Frames in the Timeline.”
Changing the Appearance of the Timeline
By default, the Timeline appears at the top of the main application window, above the Stage. To change its position, you can dock the Timeline to the bottom or either side of the main application window, or display the Timeline as its own window. You can also hide the Timeline.
You can resize the Timeline to change the number of layers and frames that are visible. When there are more layers than can be displayed in the Timeline, you can view additional layers by using the scroll bars on the right side of the Timeline.
To move the Timeline when it is docked to the application window:
-
Drag the gripper at the left of the word Timeline in the panel title bar (see Figure 4).
Figure 4. Dragging the gripper on the Timeline
To dock an undocked Timeline:
- Drag the Timeline title bar to an edge of the application window. Press Control and drag to prevent the Timeline from docking.
To lengthen or shorten layer name fields:
- Drag the bar separating the layer names and the frames portions of the Timeline.
To resize the Timeline, do one of the following:
- If the Timeline is docked to the main application window, drag the bar separating the Timeline from the Stage area.
- If the Timeline is not docked to the main application window, drag the lower-right corner (Windows) or the size box in the lower-right corner (Macintosh).
Moving the Playhead
The playhead moves through the Timeline as a document plays to indicate the current frame displayed on the Stage. The Timeline header shows the frame numbers of the animation. To display a frame on the Stage, you move the playhead to the frame in the Timeline.
When you’re working with a large number of frames that can’t all be displayed in the Timeline at once, you can move the playhead along the Timeline to easily display a specific frame.
To go to a frame:
-
Click the frame’s location in the Timeline header, or drag the playhead to the desired position (see Figure 5).
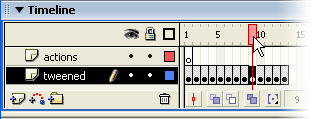
Figure 5. Clicking a frame’s position on the Timeline
To center the Timeline on the current frame:
- Click the Center Frame button at the bottom of the Timeline.
Changing the Display of Frames in the Timeline
You can change the size of frames in the Timeline and add color to sequences of frames to highlight them (see Figure 6). You can also include thumbnail previews of frame content in the Timeline. These thumbnails are useful as an overview of the animation, but they require extra screen space (see Figure 7).
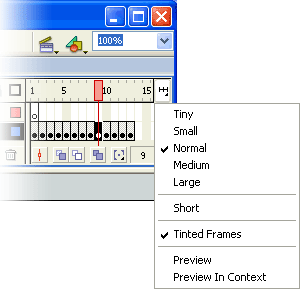
Figure 6. Frame View pop-up menu
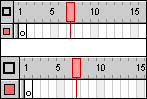
Figure 7. Short and Normal frame view options
To change the display of frames in the Timeline:
- Click the Frame View button in the upper-right corner of the Timeline to display the Frame View pop-up menu.
-
Select from the following options:
- To change the width of frame cells, select Tiny, Small, Normal, Medium, or Large. (The Large frame-width setting is useful for viewing the details of sound waveforms.)
- To decrease the height of frame cell rows, select Short.
- To turn the tinting of frame sequences on or off, select Tinted Frames.
- To display thumbnails of the content of each frame scaled to fit the Timeline frames, select Preview. This can cause the apparent content size to vary.
- To display thumbnails of each full frame (including empty space), select Preview in Context. This is useful for viewing the way elements move within their frames over the course of the animation, but previews are generally smaller than with the Preview option.
Using Frames and Keyframes
A keyframe is a frame in which you define a change to an object’s properties for an animation or include ActionScript code to control some aspect of your document. Flash can tween, or automatically fill in, the frames between keyframes you define in order to produce fluid animations. Because keyframes let you produce animation without drawing each individual frame, they make creating animation easier. You can easily change the length of a tweened animation by dragging a keyframe in the Timeline.
The order in which frames and keyframes appear in the Timeline determines the order in which they are displayed in a Flash application. You can arrange keyframes in the Timeline to edit the sequence of events in an animation.
Working with Frames in the Timeline
In the Timeline, you work with frames and keyframes, placing them in the order you want the objects in the frames to appear. You can change the length of a tweened animation by dragging a keyframe in the Timeline.
You can perform the following modifications on frames or keyframes:
- Insert, select, delete, and move frames or keyframes
- Drag frames and keyframes to a new location on the same layer or on a different layer
- Copy and paste frames and keyframes
- Convert keyframes to frames
- Drag an item from the Library panel onto the Stage to add the item to the current keyframe
The Timeline provides a view of tweened frames in an animation. For information on editing tweened frames, see “Creating Motion” in Using Flash.
Flash offers two different methods for selecting frames in the Timeline. In frame-based selection (the default) you select individual frames in the Timeline. In span-based selection, the entire frame sequence, from one keyframe to the next, is selected when you click any frame in the sequence. You can specify span-based selection in Flash preferences.
To specify span-based selection:
- Select Edit > Preferences.
- Select the General category.
- In the Timeline section, select Span based selection.
- Click OK.
For more information, see “Setting Preferences in Flash.”
To insert frames in the Timeline, do one of the following:
- To insert a new frame, select Insert > Frame.
- To create a new keyframe, select Insert > Keyframe, or right-click (Windows) or Control-click (Macintosh) the frame where you want to place a keyframe, and select Insert Keyframe from the context menu.
- To create a new blank keyframe, select Insert > Blank Keyframe, or right-click (Windows) or Control-click (Macintosh) the frame where you want to place the keyframe, and select Insert Blank Keyframe from the context menu.
To select one or more frames in the Timeline:
- To select one frame, click the frame. If you have Span Based Selection enabled in the Preferences dialog box, clicking one frame selects the entire frame sequence between two keyframes. For more information, see “Setting Preferences in Flash.”
- To select multiple contiguous frames, Shift-click additional frames.
- To select multiple discontiguous frames, Control-click (Windows) or Command-click (Macintosh) additional frames.
To select all frames in the Timeline:
- Select Edit > Timeline > Select All Frames.
To delete or modify a frame or keyframe, do one of the following:
- To delete a frame, keyframe, or frame sequence, select the frame, keyframe, or sequence and select Edit > Timeline > Remove Frame, or right-click (Windows) or Control-click (Macintosh) the frame, keyframe, or sequence and select Remove Frame from the context menu. Surrounding frames remain unchanged.
- To move a keyframe or frame sequence and its contents, drag the keyframe or sequence to the desired location.
- To extend the duration of a keyframe animation, Alt-click (Windows) or Option-click (Macintosh) and drag the keyframe to the frame that you want to be the final frame of the sequence.
- To copy a keyframe or frame sequence by dragging, Alt-click (Windows) or Option-click (Macintosh) and drag the keyframe to the new location.
- To copy and paste a frame or frame sequence, select the frame or sequence and select Edit > Timeline > Copy Frames. Select a frame or sequence that you want to replace, and select Edit > Timeline > Paste Frames.
- To convert a keyframe to a frame, select the keyframe and select Edit > Timeline > Clear Keyframe, or right-click (Windows) or Control-click (Macintosh) the keyframe and select Clear Keyframe from the context menu. The Stage contents of the cleared keyframe and all frames up to the subsequent keyframe are replaced with the Stage contents of the frame preceding the cleared keyframe.
- To change the length of a tweened sequence, drag the beginning or ending keyframe left or right. To change the length of a frame-by-frame animation sequence, see “Creating frame-by-frame animations” in Using Flash.
- To add an item from the library to the current keyframe, drag the item from the Library panel onto the Stage.
Using Layers
Layers are like transparent sheets of acetate stacked on top of each other on the Stage. Layers help you organize the artwork in your document. You can draw and edit objects on one layer without affecting objects on another layer. Where there is nothing on a layer, you can see through it to the layers below.
To draw, paint, or otherwise modify a layer or folder, you select the layer in the Timeline to make it active. A pencil icon next to a layer or folder name in the Timeline indicates that the layer or folder is active. Only one layer can be active at a time (although more than one layer can be selected at a time).
When you create a new Flash document, it contains only one layer. You can add more layers to organize the artwork, animation, and other elements in your document. The number of layers you can create is limited only by your computer’s memory, and layers do not increase the file size of your published SWF file. Only the objects you place into layers add to the file size. You can also hide, lock, or rearrange layers.
You can also organize and manage layers by creating layer folders and placing layers in them. You can expand or collapse layer folders in the Timeline without affecting what you see on the Stage. It’s a good idea to use separate layers or folders for sound files, ActionScript, frame labels, and frame comments. This helps you find these items quickly when you need to edit them. In addition, you can use special guide layers to make drawing and editing easier, and mask layers to help you create sophisticated effects.
For an interactive introduction to working with layers in Flash, select Help > Flash Tutorials > Basic Tasks > Work with Layers.
Creating Layers and Layer Folders
When you create a new layer or folder, it appears above the selected layer. The newly added layer becomes the active layer. To create a layer, do one of the following:
-
Click the Insert Layer button at the bottom of the Timeline (see Figure 8).

Figure 8. Insert Layer button
- Select Insert > Timeline > Layer.
- Right-click (Windows) or Control-click (Macintosh) a layer name in the Timeline and select Insert Layer from the context menu.
To create a layer folder, do one of the following:
- Select a layer or folder in the Timeline, and then select Insert > Timeline > Layer Folder.
- Right-click (Windows) or Control-click (Macintosh) a layer name in the Timeline, and then select Insert Folder from the context menu.
The new folder appears above the layer or folder you selected.
Viewing Layers and Layer Folders
As you work, you may want to show or hide layers or folders. A red X next to the name of a layer or folder in the Timeline indicates that it is hidden. When you publish a Flash SWF file, any layers that were hidden in the FLA document are preserved and visible in the SWF file.
To help you distinguish which layer an object belongs to, you can display all objects on a layer as colored outlines. You can change the outline color used by each layer.
You can change the height of layers in the Timeline in order to display more information (such as sound waveforms) in the Timeline. You can also change the number of layers displayed in the Timeline.
To show or hide a layer or folder, do one of the following:
- Click in the Eye column to the right of the layer or folder name in the Timeline to hide that layer or folder. Click in it again to show the layer or folder.
- Click the eye icon to hide all the layers and folders in the Timeline. Click it again to show all layers and folders.
- Drag through the Eye column to show or hide multiple layers or folders.
- Alt-click (Windows) or Option-click (Macintosh) in the Eye column to the right of a layer or folder name to hide all other layers and folders. Alt-click or Option-click it again to show all layers and folders.
To view the contents of a layer as outlines, do one of the following:
- Click in the Outline column to the right of the layer’s name to display all objects on that layer as outlines. Click in it again to turn off outline display.
- Click the outline icon to display objects on all layers as outlines. Click it again to turn off outline display on all layers.
- Alt-click (Windows) or Option-click (Macintosh) in the Outline column to the right of a layer’s name to display objects on all other layers as outlines. Alt-click or Option-click in it again to turn off the outline display for all layers.
To change a layer’s outline color:
-
Do one of the following:
- Double-click the layer’s icon (the icon to the left of the layer name) in the Timeline.
- Right-click (Windows) or Control-click (Macintosh) the layer name and select Properties from the context menu.
- Select the layer in the Timeline and select Modify > Layer.
- In the Layer Properties dialog box, click the Outline Color box and select a new color, enter the hexadecimal value for a color, or click the Color Picker button and select a color.
- Click OK.
To change layer height in the Timeline:
-
Do one of the following:
- Double-click the layer’s icon (the icon to the left of the layer name) in the Timeline.
- Right-click (Windows) or Control-click (Macintosh) the layer name and select Properties from the context menu.
- Select the layer in the Timeline and select Modify > Timeline > Layer Properties.
- In the Layer Properties dialog box, select an option for Layer Height and click OK.
To change the number of layers displayed in the Timeline:
- Drag the bar that separates the Timeline from the Stage area.
Editing Layers and Layer Folders
You can rename, copy, and delete layers and folders. You can also lock layers and folders to prevent them from being edited.
By default, new layers are named by the order in which they are created: Layer 1, Layer 2, and so on. You can rename layers to better reflect their contents.
To select a layer or folder, do one of the following:
- Click the name of a layer or folder in the Timeline.
- Click any frame in the Timeline of the layer you want to select.
- Select an object on the Stage that is located in the layer you want to select.
To select two or more layers or folders, do one of the following:
- To select contiguous layers or folders, Shift-click their names in the Timeline.
- To select discontiguous layers or folders, Control-click (Windows) or Command-click (Macintosh) their names in the Timeline.
To rename a layer or folder, do one of the following:
- Double-click the name of the layer or folder in the Timeline and enter a new name.
- Right-click (Windows) or Control-click (Macintosh) the name of the layer or folder and select Properties from the context menu. Enter the new name in the Name text box and click OK.
- Select the layer or folder in the Timeline and select Modify > Timeline > Layer Properties. In the Layer Properties dialog box, enter the new name in the Name text box and click OK.
To lock or unlock one or more layers or folders, do one of the following:
- Click in the Lock column to the right of the name of a layer or folder to lock it. Click in the Lock column again to unlock the layer or folder.
- Click the padlock icon to lock all layers and folders. Click it again to unlock all layers and folders.
-
Drag through the Lock column to lock or unlock multiple layers or folders. Alt-click (Windows) or Option-click (Macintosh) in the Lock column to the right of a layer or folder name to lock all other layers or folders. Alt-click or Option-click in the Lock column again to unlock all layers or folders.
To copy a layer:
- Click the layer name in the Timeline to select the entire layer.
- Select Edit > Timeline > Copy Frames.
- Click the Insert Layer button to create a new layer.
- Click the new layer and select Edit > Timeline > Paste Frames.
To copy the contents of a layer folder:
- Click the triangle to the left of the folder name in the Timeline to collapse it, if necessary.
- Click the folder name to select the entire folder.
- Select Edit > Timeline > Copy Frames.
- Select Insert > Timeline > Layer Folder to create a new folder.
- Click the new folder and select Edit > Timeline > Paste Frames.
To delete a layer or folder:
- Select the layer or folder by clicking its name in the Timeline or any frame in the layer.
-
Do one of the following:
- Click the Delete Layer button in the Timeline.
- Drag the layer or folder to the Delete Layer button.
- Right-click (Windows) or Control-click (Macintosh) the layer or folder name and select Delete Layer from the context menu.
Note: When you delete a layer folder, all the enclosed layers and all their contents are also deleted.
Organizing Layers and Layer Folders
You can rearrange layers and folders in the Timeline to organize your document.
Layer folders help organize your workflow by letting you place layers in a tree structure. You can expand or collapse a folder to see the layers it contains without affecting which layers are visible on the Stage. Folders can contain both layers and other folders, allowing you to organize layers in much the same way you organize files on your computer.
The layer controls in the Timeline affect all layers within a folder. For example, locking a layer folder locks all layers within that folder.
To move a layer or layer folder into a layer folder:
- Drag the layer or layer folder name to the destination layer folder name. The layer or layer folder appears inside the destination layer folder in the Timeline.
To change the order of layers or folders:
- Drag one or more layers or folders in the Timeline to the desired position above or below other layers in the Timeline.
To expand or collapse a folder:
- Click the triangle to the left of the folder name.
To expand or collapse all folders:
- Right-click (Windows) or Control-click (Macintosh) and select Expand All Folders or Collapse All Folders from the context menu.
Using Guide Layers
For help in aligning objects when drawing, you can create guide layers. You can then align objects on other layers to the objects you create on the guide layers. Guide layers are not exported and do not appear in a published SWF file. You can make any layer a guide layer. Guide layers are indicated by a guide icon to the left of the layer name.
You can also create a motion guide layer to control the movement of objects in a motion tweened animation. For more information, see “Tweening Motion Along a Path” in Using Flash.
Note: Dragging a normal layer onto a guide layer converts the guide layer to a motion guide layer. To prevent accidentally converting a guide layer, place all guide layers at the bottom of the layer order.
To designate a layer as a guide layer:
- Select the layer and right-click (Windows) or Control-click (Macintosh) and select Guide from the context menu. Select Guide again to change the layer back to a normal layer.
Comments