
Enabling User Input with Text Entry Boxes
Enabling User Input with Text Entry Boxes
Text entry boxes are a great way to test knowledge. In Captivate, you not only provide the text entry area but you can also tell Captivate which text should be placed in the text entry box. When the user presses the Enter key after entering the text, Captivate matches the text against what the user has entered and, depending on the input, acknowledges whether the input is correct or incorrect. Captivate can even provide a hint to the correct answer, if you want.
Here’s how you enable user input:
- Double-click the last slide in the Storyboard view to open it in the Edit view.
- Select Insert > Text Entry Box to open the New Text Entry Box dialog box.
- Click inside the Correct Entries field and enter web.studentportfolios.ca.
- Select No Action from the On Success pop-up menu. There is no action assigned here because the actions involve some form of navigation. The intention is to stay on this slide.
-
In the If the User Enters the Text Incorrectly area, click Infinite Attempts (see Figure 21). You will be providing a hint so there is no need for an action.
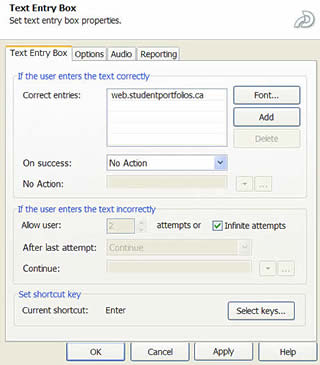
Figure 21. The correct text and action to be taken are added to the New Text Entry Box dialog box
- Click the Options tab and select No Transition from the Effect pop-up menu. This stops the input box from fading in or out.
-
In the Options area, clear both the Show Button and Show Text Box Frame check boxes (see Figure 22). You don’t show the button because text input boxes traditionally have a Submit button. This text area doesn’t, so you don’t need it. Removing the frame gives the illusion of entering text directly into the text input box in Dreamweaver.

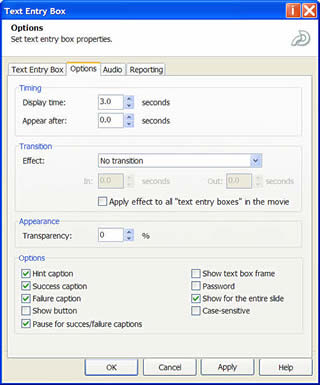
Figure 22. Text Entry Box options specify the type of captions displayed as well as the text box appearance
- Click OK to close the dialog box.
-
Insert text input boxes in the remaining three areas of the slide.
Tip: Double-click any caption to open the Text Caption dialog box for it. Also, click the text input box and drag a handle to resize the box in case the text in the box appears too large for it.
- Test the slide by clicking the Preview button on the main toolbar and selecting Preview From This Slide. When the Preview opens, enter the text and press the Enter key. Depending on your answer, you will see the success, failure, and hint captions.
-
Click the Close Preview button at the top of the Preview window to return to the slide (see Figure 23).
Figure 23. Slide with text input box and captions (objects are not visible when the SWF file plays)
- Make any changes and save the presentation.
Comments