
Designing with CSS in Dreamweaver MX 2004 – Part 3: Writing the Footer Selector
Writing the Footer Selector
Make the footer selector the same way you created the other selectors. The footer will also be an ID selector, so it will begin with the pound (#) sign.
Earlier in this series you created the nav div and gave it a bottom border. Provide a border for the footer div, except this time, make it a top border rather than a bottom border. You can keep the border black if you want. Add two other property and value pairs to this selector: Give the footer a background color of #003366 and a text color of white.
The completed selector for your footer should like the following:
#footer{
 border-top: 1px solid #000000;
 background-color: #003366;
 color: #FFFFFF;
 }
The next step is to add the footer div to the basiclayout.html page. Locate the closing wrapper div tag in the Code view and add the footer div immediately above it, as shown in the code below:
</div>
 <div id="footer"></div>
 </div>
 </body>
</html>
Adding Text to the Footer Div
This is the final step. You will undoubtedly want to add text to your footer, so define how that will look with regard to its size. Most importantly, set specific margins and padding values to ensure you don’t use the default settings, which can vary greatly from browser to browser, as I discussed earlier.
Because the text in your footer resides in a p element, you need to reflect this in your selector. You can do this by using the descendant selector. Set the default margins to zero, provide a little room around the text by giving it a padding value of 10 pixels, and make the text 70% of the size you set against the body.

Open basiclayout.css in Dreamweaver and set the following styles:
- #footer p{ is the descendant selector, which affects only the
pelements that reside within the footer div - font-size: 70% scales the font size to 70% of the default value set in the body selector
- margin: 0; zeroes off the default browser margins
- padding: 10px; sets a value of 10 pixels for the padding on the
pelement
Locate the footer div in basiclayout.html and add the p element as shown below:
<div id="footer"><p>My company info</p></div>
Preview the page in your chosen browser (see Figure 18).
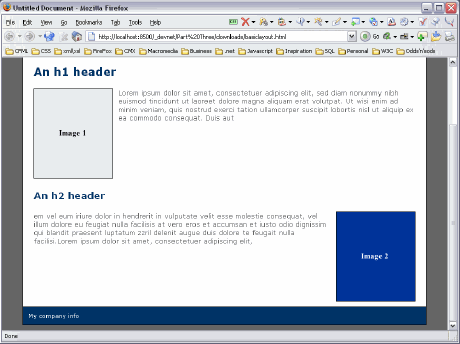
Figure 18. The completed design without tables
Conclusion
You have just completed your first design without using tables. While this is a fairly simple layout, you have learned some new techniques to add to your design armory. Creating layouts with CSS positioning is not harder than working with tables, it is just different. Sometimes that means learning some new skills to complete common tasks differently.
Once you become more familiar with CSS positioning and many of these tasks become second-nature, you will find that designing with CSS is much nicer than designing with tables. Designing with CSS has a lot of advantages with regard to layout control and the appearance of your site.
Comments