Combine model shot and vectors to create a stunning photomontage in Photoshop CS5
We have another great tutorial available for our readers today. If you want to learn how to mix different vectors, brushes and stocking image in Adobe Photoshop CS5 to create a stunning photomontage, then this tutorial is for you. Layered PSD file included. Let’s get started!
Final Image Preview
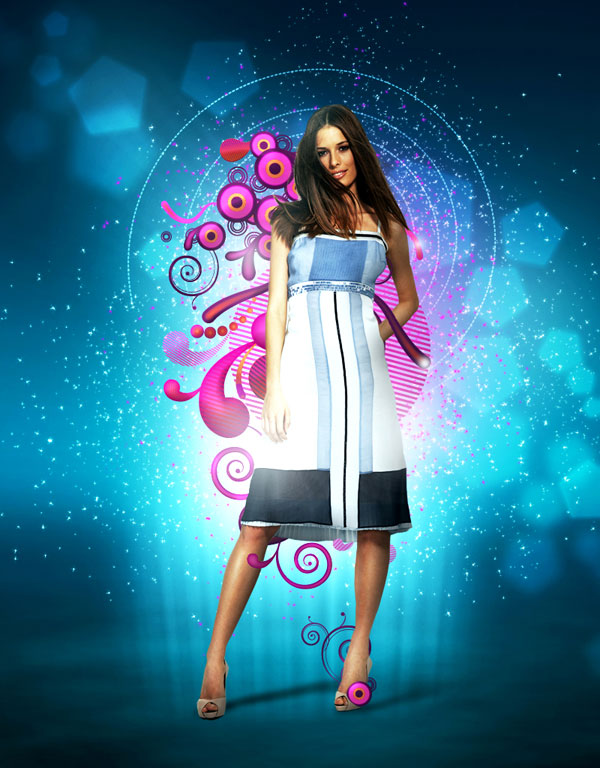
Start working by creating a new document (Ctrl+N) in Adobe Photoshop CS5 with the size 800px by 1024px (RGB color mode) at a resolution of 72 pixels/inch. Use the Paint Bucket Tool (G) to fill with #05A4B9 color the new background layer.
#img1.jpg
Find a stock photo with a model represented on it, I used this photo from deviantart. I would like to thank the author of this photo, or if you prefer, you can substitute similar image of your own.
#img2.jpg
Remove the background using your favorite tools like Pen Tool (P), Magic Wand Tool (W), Magnetic Lasso (L) or even a simple Filter>Extract and insert it on a new layer in our main document.
#img3.jpg
Click on Add a layer style icon from bottom part of the Layers panel and select Bevel and Emboss.
#img4.jpg
We’ve got the next result:
#img5.jpg
Create a new layer and select the Soft Round brush.
#img6.jpg
Use this brush to paint the canvas us shown with #143648 color (set brush's Opacity to 20% in Options bar). The layer must be situated lower than the girl’s layer.
#img7.jpg
Create one more new layer and use here also the Soft Round brush mentioned above to continue painting the canvas. The brush’s color is #143648 (Opacity - 10%). This layer will be situated also lower than the girl’s layer.
#img8.jpg
Create a new layer and fill it with black color using the Paint Bucket Tool (G). Then apply on the layer the next filter: Filter > Render > Clouds. The layer needs to be placed under the model’s one.
#img9.jpg
Press on the made layer CTRL+L to open Levels dialog box. Set Output Levels: 0/85:
#img9-1.jpg
We’ve got the next result:
#img10.jpg
Next we need to select the Free Transform (Ctrl+T) command and resize the layer on the bottom part to create a kind of flatness.
#img11.jpg
Insert the mask on the layer by choosing Add layer mask on the bottom part of the Layers panel and choose the Soft Round brush of black color (set Opacity to 15% in Options bar).
#img12.jpg
Paint in the mask using this brush to hide the layer as shown.
#img13.jpg
Create a new layer again and apply on it the Soft Round brush mentioned on the previous example.
#img15.jpg
Use this brush to paint the canvas as shown. The brush’s color is #006BA3 (Opacity - 20%). Place the layer under the model’s one.
#img14.jpg
On the next new layer we have to use the same Soft Round brush of white color (Opacity - 20%) to add a white spot behind the model.
#img16.jpg
Set the Blending mode for this layer to Hard Mix.
#img17.jpg
Make a copy of the layer containing the model’s image (remove the Bevel and Emboss) and apply on the copy Color Overlay:
#img18.jpg
We’ve got the next result:
#img19.jpg
Place the layer lower than the primary layer with the model. Choose after that the Free Transform (Ctrl+T) command, select Warp option in Options bar and warp the layer to represent the model’s shadow. Place the layer under the original model’s layer.
#img20.jpg
Insert the mask on the layer by choosing Add layer mask on the bottom part of the Layers panel and choose the Soft Round brush of black color (set Opacity to 15% in Options bar).
#img21.jpg
Paint in the mask using this brush to hide the shadow as shown.
#img22.jpg
Select Star 33 pixels brush and customize the brush in Brushes panel (F5), select the Brush Tip Shape. Click and drag any of the sliders to change the size, angle and the brush spacing as show. The Preview window displays the changed brushstroke.
#img23.jpg
Go to Shape Dynamics:
#img24.jpg
Set Scattering:
#img25.jpg
Create a new layer and paint with brush of white color to represent many small dots behind the model.
#img26.jpg
Make a copy of the last made layer:
#img27.jpg
Create a new layer and apply the brush to insert more dots on the canvas of smaller size this time.
#img28.jpg
Let’s represent the rays under the model’s feet directed to the top of the canvas. Create a new file (File>New) with the size 500px by 500px (RGB color mode) at a resolution of 72 pixels/inch. Take the Gradient Tool (G) and open the Gradient Editor from Options Bar. Choose the Black, White gradient and apply the gradient from the bottom part of the canvas to the top.
#img29.jpg
Apply the made layer the next filter: Filter>Distort>Wave:
#img30.jpg
We’ve got the next result:
#img31.jpg
Next use the Free Transform (Ctrl+T) command (Warp) option to insert the made layer on the main picture under the girl’s layer.
#img32.jpg
The layer’s parameters:
Fill 42%
Blending mode-Linear Dodge
#img33.jpg
Insert the mask on this layer by clicking on the bottom part of the layers’ panel on Add a Mask option and choose the standard brush of black color (Opacity 20%) to clean out the top part of the rays’ layer.
#img34.jpg
#img35.jpg
Make a copy of the recently made layer and choose for the copy the next parameter:
Fill 9%
#img36.jpg
Ĺůĺ đŕç ęîďčđóĺě ńëîé ëó÷ĺé. Ń ďîěîůüţ Free Transform íŕęëîí˙ĺě âëĺâî č íĺěíîăî óěĺíüřŕĺě. Ďđčěĺí˙ĺě ďŕđŕěĺňđ ńëî˙. Ńëîé đŕńďîëŕăŕĺě íčćĺ ńëî˙ ń äĺâóřęîé
Make one more copy of the rays’ layer and select the Free Transform option to incline the copy to the left side and make it smaller. We have to change also the layer’s parameter. The layer will be situated lower than the girl’s layer.
Fill 29%
#img37.jpg
Take now the Polygon Tool (U) (sides5) to draw several pentagons of white color. Place the layers lower than the girl’s layer.
#img38.jpg
Set for the made layers the same parameters:
Fill 24%
#img39.jpg
Put together the pentagons’ layers into two ratserized layers (the pentagons elements on the girl’s left side – into one layer and the others on the right side – into the next one). In this case mark out both layers pressing CTRL button and then CTRL+E.
Choose for the rasterized layer Filter>Blur>Gaussian blur
#img40.jpg
Select Free Transform option to place the layers exactly as on the picture below:
#img41.jpg
The layers’ parameters:
Blending mode-Overlay
#img42.jpg
Next pass on the Adobe Illustrator program and select the Spiral Tool to draw a spiral of black color. Set preliminary the next shown parameters:
#img43.jpg
#img44.jpg
#img45.jpg
We’ll get a kind of spiral like the next one:
#img46.jpg
Mark out the spiral and press CTRL+C. Pass again on the Adobe Photoshop program. Press CTRL+V (Smart Object regime). Select then the Free Transform option and turn over the spiral placing it as on the next picture. The layer will be placed lower than the girl’s layer.
#img47.jpg
Use for the layer CTRL+I and also
Fill 64%
Blending mode-Luminosity
#img48.jpg
Make a copy of the last made layer and choose the Free Transform option to turn over the copy’s layer, making it also smaller. Apply also different parameters. The layer will be situated lower than the girl’s one.
Fill 59%
#img49.jpg
Use now the earlier made pentagons’ layers. Put together the layers into a rasterized layer and then apply the Free Transform option to situate the layer as on the next picture. Choose also for the layer Filter>Blur>Gaussian blur
#img50.jpg
#img51.jpg
The layer’s parameters:
Blending mode-Overlay
#img52.jpg
Create a new layer and apply the standard brush of white color (Opacity 20%) to use it above the layer with the pentagons. The layer needs to be situated under the girl’s one.
#img53.jpg
#img54.jpg
Click on the bottom part of the layers’ panel on Create new fill or adjustment layer>Curves and place the layer under the girl’s one.
#img55.jpg
#img56.jpg
Create a new layer and use on it the earlier set brush of the color #F069F4 to represent many dots on the central part of the picture. Place the layer under the girl’s one.
#img57.jpg
The layer’s parameters:
Blending mode-Hard Mix
Blending Options>Outer Glow
#img58.jpg
#img59.jpg
Create a new layer and use the standard brush of the color # FF00CB (Opacity 20%) to draw a kind of spot in the middle part of the picture. The layer will be situated lower than the girl’s layer.
#img60.jpg
#img61.jpg
Download out of Internet the next ornament (http://www.vecteezy.com/vf/1278-WG-Funny-Swirls-Vol1) and insert it on the picture. Place this layer under the girl’s one.
#img62.jpg
Choose next shown parameters for the ornament’s layer.
Blending Options>Bevel and Emboss
#img63.jpg
#img64.jpg
Click on the bottom part of the layers’ panel on Create new fill or adjustment layer>Hue/Saturation
#img65.jpg
#img66.jpg
Press Alt button and click between the layers on the layers’ panel:
#img67.jpg
#img68.jpg
Try to rasterize the girl’s layer now. In this case create a new layer above the girl’s layer and mark out them both, pressing CTRL and then press CTRL+E
Also we have to insert the mask on the girl’s rasterized layer. Click on the bottom part of the layers’ panel on Add a Mask option and select the standard brush of black color to clean out the girl, creating the effect of her presence inside the ornament.
#img69.jpg
#img70.jpg
Click on the bottom part of the layers’ panel on Create new fill or adjustment layer>Hue/Saturation
#img71.jpg
#img72.jpg
Press Alt button and click between the layers on the layers’ panel:
#img73.jpg
#img74.jpg
Click on the bottom part of the layers’ panel on Create new fill or adjustment layer>Curves
#img75.jpg
#img76.jpg
Create a new layer and apply the standard brush of different diameter and white color (Opacity 20%) to draw a luminescence on the marked places.
#img77.jpg
#img78.jpg
Click again on the bottom part of the layers’ panel on Create new fill or adjustment layer>Curves
#img79.jpg
#img80.jpg
On the next new layer use the Paint Bucket Tool (G) to make it of the color #397688
#img81.jpg
The layer’s parameters:
Fill 16%
Blending mode-Hard Mix
#img82.jpg
Finished!