
Capitalize on custom transitions
Each transition in Adobe® Premiere® Pro 1.5 has its own collection of customizable settings. The options available depend on the transition you’re modifying. By modifying these settings, you can effectively expand your list of 74 video transitions. You can, for example, set the Wipe transition to wipe in any of eight directions; you can make it hard-edged or soft-edged; and you can add a border of any color or thickness.
As usual, you have to add the transition to a cut first and then select it to modify its settings on the Effect Controls palette.
In this tutorial, we’ll show you how to customize some of the transitions available in Premiere Pro.
Get started
We’ll start by setting the direction of a transition.
To set the direction of the transition:
-
On the Effect Controls palette, click the small arrows, or edge selectors, around the transition thumbnail to select the orientation of the transition (Figure 1).

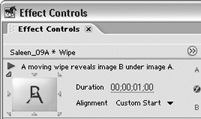
Figure 1: Click one of the small arrows to set the direction of the transition. Here, a wipe is set to progress from the top-left corner of the image.
The movement of the transition, such as the direction of a wipe, progresses in the direction you specify (Figure 2).
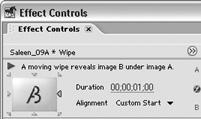
Figure 2: Here, the wipe is set to begin from the right side.
Comments