
Building a Forum with Dreamweaver – Part 4: Sending Reply Notifications by E-mail
Sending Reply Notifications by E-mail
In this section, you will enhance your forum by allowing users to receive an e-mail when a reply has been posted to one of the threads they subscribed to.
Subscribing to a thread is done when the Subscribe check box in the post or reply message page is checked. When a user checks the Subscribe check box, the value of the subscribe_msg column from the message_msg table is set to 1. You will modify the reply_message.php page so that it sends an e-mail message to all users who have subscribed to the thread. Each user who checked the Subscribe check box when posting a message or a reply will receive an e-mail when another reply is posted by a different user.
The e-mail notification will be implemented using the Send E-mail To Recipients From Recordset server behavior. Before applying this server behavior, you must create the recordset that retrieves the e-mail addresses of all users subscribed to the thread:
- Open the reply_message.php page in Dreamweaver.
-
The recordset that contains the e-mail addresses of all subscribed users will have to retrieve its data from two tables:
message_msganduser_usr. To create this recordset, you also need to define these conditions. - The
subscribe_msgcolumn must be equal to1to prevent sending notifications to people who are not interested in receiving them. - The
id_init_msgcolumn must be equal to theid_init_msgURL parameter to make sure that only replies from the current thread are taken into account. -
The
id_usrcolumn must be different from thekt_login_idsession variable that stores the current user’s ID. Otherwise, the user also receives a notification when he or she replies to one of the messages in the thread.Go to the Bindings tab, click the Plus (+) button, and select the Recordset (Query) option from the pop-up menu that is displayed.

-
Configure the simple Recordset dialog box as follows:
- In the Name text box, enter rsSubscribers.
- In the Connection pop-up menu, select connForum.
- In the Table pop-up menu, select
message_msg. -
Click the Advanced button to build the query conditions.
- In the Advanced Recordset dialog box you can enter your own SQL code and define variables. First, you must enter the SQL code to perform the
JOINbetween themessage_msganduser_usrtables. In the SQL text area, enter the following code aftermessage_msg:LEFT JOIN user_usr ON idusr_msg=id_usr
-
Define the variables needed to build the conditions. Click the Plus (+) button next to the Variables grid and configure the Add parameter dialog box as shown in Figure 13:
- In the Name text box enter initid.
- For the Default value enter -1.
-
For the Runtime value enter $_GET[‘id_init_msg’].
-
In a similar manner, add another parameter and configure it as follows:
- In the Name text box, enter userid.
- For the Default value, enter –1.
-
In the Runtime value text box, enter the session variable storing the user ID: $_SESSION[‘kt_login_id’]
- Write the SQL code that defines the conditions, using the variables you have defined. In the SQL text area, after the existing code, enter:
WHERE id_init_msg=initid AND id_usr!= userid AND subscribe_msg=1
Figure 14 shows what the Recordset dialog box should look like.
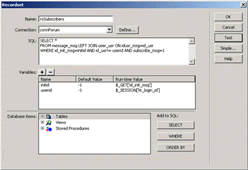
Figure 14. rsSubscribers recordset
- Click OK to create the recordset.
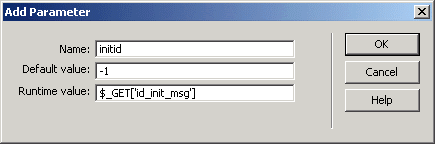
Figure 13. Configuring the SQL variables
When you have the e-mail addresses of the thread subscribers, you can apply the Send E-mail To Recipients From Recordset server behavior. This server behavior sends an automatic e-mail message to a list of e-mail addresses extracted from your database. You can access it from the Server Behaviors tab by selecting Plus (+) > MX Kollection > Send E-mail. The message will contain the entire reply contents, as well as a link to the thread.
Configure the server behavior as follows:
- In the Recordset pop-up menu, select the rsSubscribers recordset you created earlier.
- In the E-mail to menu, select the
email_usrfield. This is the field that contains the e-mail addresses. - In the From text box, enter an e-mail address or leave it at its default value. (This value can be changed by selecting E-mail Settings in the InterAKT Control Panel.)
- In the Subject text box, type the following text: A new reply has been posted to the Forum
- The message body will contain both plain text (static values) and information from the database (dynamic values). With the InterAKT Dynamic Data, you can use fields from the current transaction, recordset fields, and other variables. You will include the reply subject and content in the e-mail message.
-
Place the cursor in the Content text area. On the first line you will address the recipient. Type Dear and then click the InterAKT Dynamic Data icon (see Figure 15).
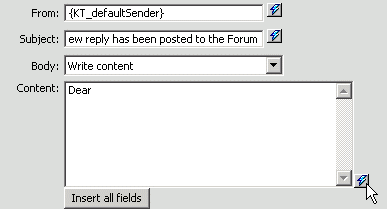
Figure 15. Inserting dynamic data in the message body
In the InterAKT Dynamic Data dialog box, select Recordset Field in the Get Value From pop-up menu. Choose the rsSubscribers recordset and the
name_usrfield (see Figure 16).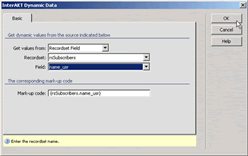
Figure 16. Inserting the user name in the message body
-
Click OK to insert the user’s name. Notice the InterAKT mark-up code that is added in the message body (see Figure 17).
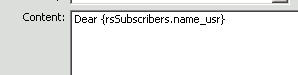
Figure 17. InterAKT mark-up code
- To preserve formatting, you will send the e-mail in HTML format. You must use a basic set of tags to make sure the message is viewed as intended. For example, to create a new line. use the
-
After the mark-up code for the user name, enter the following:
,
A new reply has been posted to a thread you subscribed to:Tip: To make the text more clear, you can use the Enter (or Return) key to start a new line. However, new lines created like this will not be converted to line breaks in the actual message.
-
Add the message subject by using the InterAKT Dynamic Data dialog box again. This time you will retrieve the subject from the current insert transaction (see Figure 18).
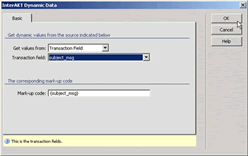
Figure 18. Using the InterAKT Dynamic Data dialog box to insert the thread subject
- After the message subject, enter another
-
Finally, insert a link that points to the view_message.php page; this also passes the current topic’s ID. After the last mark-up code, enter the following:
To read the entire thread, click After you finish configuring the server behavior, the Main tab should look like the one in Figure 19.
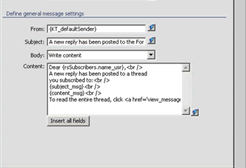
Figure 19. Configured e-mail message
-
On the Options tab, verify that the HTML text option button is selected (see Figure 20). This ensures that the message will be delivered in HTML format.
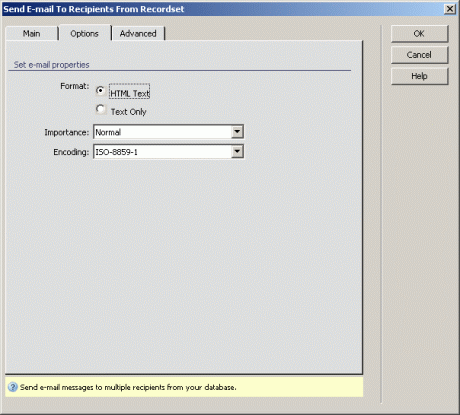
Figure 20. Setting the e-mail format to HTML
- Click OK to close the dialog box and apply the server behavior.
Now when users select the Subscribe option when posting a message or a reply, they will receive an e-mail similar to the one shown in Figure 21.
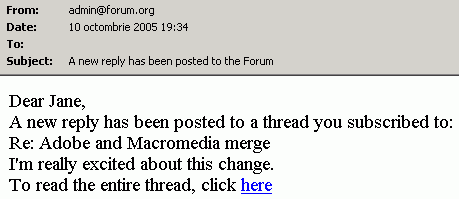
Figure 21. Sample reply notification
Congratulations! You have finished building your very own forum application. Feel free to improve it in any way you want using any of the Dreamweaver 8 and ImpAKT server behaviors and features.
Where to Go from Here
In this article, you have learned how to do the following:
- Set up a professional user authentication system for your web applications
- Build insert forms that submit information to a database
- Validate user input
- Send automatic e-mail messages
Comments