Adding Your Own Text, Graphics, and Animations
Adding Your Own Text, Graphics, and Animations
Customizing the user interface and content in the presentation can be as simple or complex as your presentation requires.
There are several things you can do to customize the content on the screens:
- Change the background graphics and user interface
- Customize the text, graphics, and animations while the video plays
- Add and delete screens to match the cue points in your video
- Animate screens using screen transition behaviors
Changing the Background Graphics and Colors
You can add logos, background images or colors, borders, and anything else you want to display throughout the presentation. Aside from adding your own video, this is probably the quickest and easiest way to make the presentation truly look like your own.
Keep in mind that adding a large bitmap image increases the size of your presentation significantly, so it will require more time to download. Instead, create vector graphics using the drawing tools in Flash or an application such as Fireworks because they make background images much smaller.
To add your own graphics or colors:
- Click the background screen. The template has four graphics on the screen: title text at the top, a gray box around that text, a dark gray line at the bottom of the gray box, and a second gray box at the bottom of the screen.
- Use the Flash drawing tools in the Tools palette on the left to create your own titles, borders, and background colors.
To add a new background graphic:
- Choose File > Import > Import to Stage.
-
Select the file to import in the Import dialog box and click OK.
For some file types, you may see an additional dialog box with options you can set for that particular file.
- Position the file where you want it to appear onscreen.
To resize the graphic, right-click (Control-click on the Mac) the graphic and select Free Transform from the pop-up menu.
To add a background color or border, select the background screen and use the drawing tools in the Tools panel to add a colored box, draw graphics, and so on. Anything you add to the background screen appears on all subsequent screens.
Customizing Text and Graphics While the Video Plays
While the video plays, text and graphics appear on the screen. The text and graphics are carefully synchronized with the video so that they appear just as the video reaches specific cue points. You will probably want to update the text and graphics that appear when your own video plays.
Use screens to place content in your presentation. By synchronizing the screen appearance with your video, you control the content that appears alongside your video. When the video reaches certain cue points, the screens will appear.
To add your own text and graphics to an existing screen, just edit the text and graphics on each screen in the template. Synchronize those screens with your video by changing the cue points in the FLVPlayback component to trigger the screens at the right moment.
To change any screen in the template, simply select the one you want to change and edit its contents. When you edit a screen, you see the background images and text—and the navigation buttons—on the screen, but they are dimmed so you can tell what’s on the screen and what’s on the background or controls screens. Remember that you can edit only the text on the screen you have currently highlighted.
The four animated sections of content animate using a simple tween to zoom the text into place. Feel free to retain or remove these Flash effects. However, note that using animations sometimes delays the contents from appearing on the screen right away because the screen’s content has to animate into view first before you can see it.
To see the animation, click at the beginning (far left) of the Timeline to move the red current frame indicator to that frame. Drag the red frame indicator along the Timeline to see the animation below it. You can also click the last frame on the Timeline to see the end state of the animation.
In most cases you will want to delete the layers containing the existing animation and add your own layers, content, and effects. You may find it easiest to delete the supplied screens and start with empty ones.
Note that if you change the screen names, you will have to update the associated cue point names in the FLVPlayback component parameters and the associated button instance names on the navigation bar layer.
Adding and Deleting Screens in Your Presentation
The previous section explained how to change the content on your screens. In this section, you learn how to add and remove screens. Content screens appear when the video reaches a specific cue point. Whenever you add or delete screens, you have to add or remove the corresponding cue point on the media component and update the associated button instance name in the navigation bar.
The presentation contains five content screens. You can add as many as you need.
To add a new screen:
- Highlight the screen above the one you want to add and right-click (Control-click on the Mac) the screen and select Insert Screen from the pop-up menu.
- Double-click the screen icon on the left (called “slide1”) and rename your screen. Screen names cannot contain spaces.
- Add any text and graphics to your screen and animate it any way you want.
You will probably want to synchronize the screen with your video so it appears at a particular cue point during video playback:
- Highlight the controls screen.
- Click the FLVPlayback component in the center left of the screen.
- Open the Component Inspector panel on the right.
- In the cuePoints parameter in the Component Inspector panel, add your screen name in the cue point name field and add the time to synch to in the time field.
- To associate the button highlight with a particular button and cue point, select the button instance on the Navigation bar layer that you want to associate with the new cue point. Make sure you select the button and not the graphics behind the button.
- In the Property Inspector, name the button instance with the cue point name and append _btn to it.
Deleting screens is easy. Simply highlight the screen in the Screens Outline pane and press the Delete key. You should also remove the screen cue point from your video:
- Highlight the controls screen.
- Click the FLVPlayback instance.
- Open the Component Inspector panel.
- Enter the Flash Video Cue Points editor by double-clicking the cuePoints parameter. Remove the reference to the cue point by selecting the cue point name field and clicking the minus (–) button.
Animating Screen Content Using Screen Transitions
Another way to animate screen content is by using screen transition behaviors. This approach may appeal to anyone looking for a quick and easy way to create movement onscreen. Screen transitions are capable of animating content with a range of preset transition types, including fade, zoom, fly, and wipe, to name a few. Screen transitions can animate the content as it enters the view and exits the view. You control screen transitions through the Behaviors panel.
To add or edit a screen behavior, you must first select the screen in the Screen Outline pane:
- Select the introduction screen. You will add a transition behavior to demonstrate the process.
-
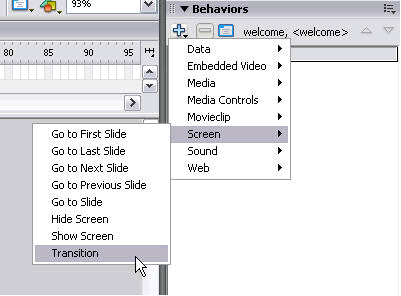
With the introduction screen selected, click the plus icon (+) in the Behaviors panel and choose Screen > Transition (see Figure 9).

Figure 9. Behaviors panel’s Screen menu
-
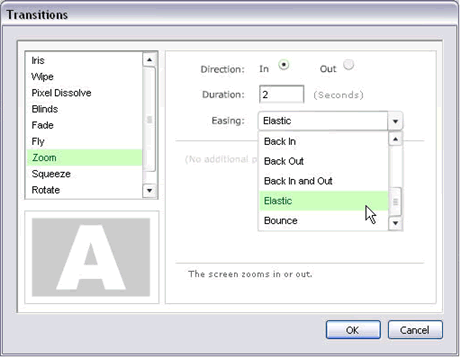
In the dialog box that appears, choose a transition type and adjust the parameters as desired. Figure 10 shows the Zoom transition setting with Easing set to Elastic. Note that the Easing parameter can affect the animation in some really fun ways. Click OK.

Figure 10. Transitions dialog box modifying the Zoom transition
- Look at the Behaviors panel to see the added behavior. Notice that the Event is automatically set to Reveal. This means that the animation will occur when the screen first appears. You may also insert an exit transition by adding another transition behavior and setting the event field to the Hide event. In this case the content will animate when the screen is hidden. For transitions that occur upon exit, you will usually set the transition Direction parameter to Out.
- Select Test Movie from the Menu > Controls submenu (or press Ctrl+Enter) to see the results.
Note that you can use multiple behaviors per event per screen. That means you can combine the transition behaviors with other behaviors during the reveal and hide events. This may be useful when creating screens that contain transitions and you need to control the timeline of the screen when it is shown and hidden.


Comments