
Applying Easing and Custom Ease-in and Ease-out to Motion Tweens
Applying Easing and Custom Ease-in and Ease-out to Motion Tweens
The term easing refers to gradual acceleration or deceleration during an animation, which helps your animations appear more realistic. Easing creates a more natural appearance of acceleration or deceleration by gradually adjusting the rate of change.
To produce a more realistic sense of motion, you can apply easing to the motion tween you create. Flash provides two methods by which you can apply easing to a motion tween: You can specify an easing value for each motion tween you create using the Ease slider, or you can use the Custom Ease In/Ease Out dialog box (Flash Professional only) to control the speed of the motion tween more precisely.
To apply regular easing to a motion tween:
- Create a new file and call it motionease.fla.
- Select Frame 1 of Layer 1. This is where the animation will start.
- Create a graphic with the Pen, Oval, Rectangle, Pencil, or Brush tool. Select it and then choose Modify > Convert to Symbol.
- In the Convert to Symbol dialog box, make sure the Movie Clip option is selected and then click OK. The graphic you created is an instance on the Stage (with a symbol in the Library).
- Select Frame 10 on Layer 1 and then press F6 to create a second keyframe. This is where the animation will end.
-
Select your instance on the Stage at Frame 10. Do any of the following to modify the instance:
- Move it to a new position on the Stage.
- Modify the item’s size, rotation, or skew using the Free Transform tool.
- Click any frame in the tween’s frame span (for example, select Frame 5 of Layer 1) and select Motion from the Tween pop-up menu in the Property inspector (Window > Properties > Properties).
-
With the frame still selected, drag the arrow next to the Easing value in the Property inspector (Window > Properties > Properties) or type in a value to adjust the rate of change between tweened frames:
- To begin the motion tween slowly and accelerate the tween toward the end of the animation, drag the slider up or enter a negative value between –1 and –100.
-
To begin the motion tween rapidly and decelerate the tween toward the end of the animation, drag the slider down or enter a positive value between 1 and 100.

Note: By default, the rate of change between tweened frames is constant. Easing creates a more natural appearance of acceleration or deceleration by gradually adjusting the rate of change.
- Select Control > Test Movie to test the animation.
The SWF file in Figure 11 shows regular easing (the top bee) and customized easing (the bottom bee). The vertical line that animates from left to right has no easing applied.
Figure 11. Regular easing (top bee) and customized easing (bottom bee)
Custom easing enables you to control these elements through an intuitive graph that provides independent control over the position, rotation, scale, color, and filters used in a motion tween. When you create a motion tween and then select it in the Timeline, you can click a button labeled Edit to customize the motion tween (see Figure 12).
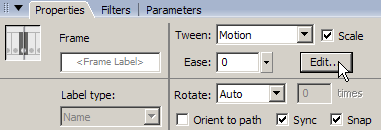
Figure 12. Clicking the Edit button in the Property inspector to customize the easing of a tween
The Custom Ease In/Ease Out dialog box displays a graph representing the degree of motion over time (see Figure 13). Frames are represented by the horizontal axis and the tween’s percentage of change is represented by the vertical axis. The first keyframe is in the animation is at 0% and the last keyframe is at 100%. The rate of change of the tweened instance is shown by the slope of the graph’s curve. If you create a horizontal line (no slope) on the graph, the velocity is zero; if you create a vertical line on the graph, there is an instantaneous rate of change.
To open the custom easing dialog box:
- Create a motion tween, as described in the first example in this section.
- Click any frame in the tween’s frame span and select Motion from the Tween pop-up menu in the Property inspector (Window > Properties).
-
Click the Edit button (next to Ease) in the Property inspector to open the Custom Ease In/Ease Out dialog box (see Figure 13).

Figure 13. Editing the graph to customize easing of the motion tween and produce the following animation:
The dialog box provides the following additional controls:
- Use One Setting for All Properties check box: The default value for this is selected, which means that the displayed curve is used for all properties and the Properties pop-up menu is disabled. When the check box is not selected, the Properties pop-up menu is enabled and each property has a separate curve defining the velocity of that property.
-
Property pop-up menu: This menu is enabled only when the Use One Setting for All Properties check box is not selected. When enabled, a separate curve is maintained for each of the five properties appearing in the menu. Selecting a property in the menu displays the curve for that property. The properties are as follows:
- Position: Specifies custom ease settings for the position of an animated object on the Stage.
- Rotation: Specifies custom ease settings for the rotation of an animated object. For example, you can fine-tune how quickly or slowly an animated character turns around to face the user on the Stage.
- Scale: Specifies custom ease settings for the scale of an animated object. For example, you can customize the scale of an object more easily so it appears to be moving away from the viewer, then coming closer, and then moving away again.
- Color: Specifies custom ease settings for color transitions applied to an animated object.
- Filters: Specifies custom ease settings for filters applied to an animated object. For example, you can control the ease setting of a drop shadow that simulates a change in the direction of a light source.
- Play and Stop buttons: These buttons enable you to preview an animation on the Stage using all the current velocity curves defined in the Custom Ease In/Ease Out dialog box.
- Reset button: This button enables you to reset the velocity curve to the default, linear state.
- Position of the selected control point: In the lower-right corner of the dialog box, a numeric value displays the keyframe and position of the selected control point. If no control point is selected, no value appears.
To add a control point to the line, click the diagonal line once. This adds a new control point to the line. By dragging the positions of the control points, you can achieve a precise degree of control over the motion of an object.
Using frame indicators (represented by square handles), you click where you want an object to slow down or speed up. Clicking the handle of a control point (the square handles) selects that control point and displays the tangent points on either side of it. Tangent points are represented by hollow circles. You can drag the control point or its tangent points with the mouse or you can position them using the keyboard’s arrow keys.
Tip: By default, the control points snap to a grid. You can turn off snapping by pressing the X key while dragging the control point.
Clicking an area of the curve away from any control points adds a new control point to the curve at that point without changing the shape of the curve. Clicking away from the curve and control points deselects the control point that is currently selected.
Comments