
Realistic Wine Bottle
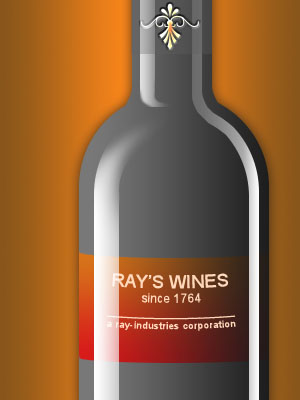
In this tutorial I will guide you through the steps of creating a realistic Wine Bottle, customizable to represent anything. Also I will give you hints on how to create a label for it, and fixing it with some ornaments to give it a rich look. Everything is explained, but I assume you have some basic skills in Photoshop, as what which tool does, and the basic commands. Many parts of this tutorial can be done differently, but that’s the beauty of Photoshop, million ways to do one thing. I’m sure you would first want to see what will come out of this, so here’s a sneak preview:
I don’t want to bug you too much, so let’s head on to the job.
1. Creating the background
The background is quite simple. First create a new document 300×400. The background color is not important. Now grab the gradient tool, and create a gradient with these colors:

Now start dragging the gradient tool from the left to the right, while holding Shift (to ensure a straight line). That’s it. 🙂
2. Creating the bottle
Select the rounded rectangle tool, and select a radius of 100px. Create a shape 190×400 pixels and position it like this (so that the rounded corners on the bottom are not visible). Like this:
Name the layer “bottle body”. Now let’s add-on the bottle head. Create a rectangle shape with about 80 pixels width, and make it high enough to get out of the top of the document, and connect properly to the bottle body. Now select the Add Anchor Point tool and add two anchor points at these positions:

Now move the lower 2 anchor points towards the ends of the document, like this:
At this point we need to rasterize these two layers. Select the bottle body and go to Layer > Rasterize > Layer. Now select the other upper layer and rasterize it the same way. While having the upper layer selected press Ctrl + E, or go to Layer > Merge Down. The layer’s name probably got renamed to “Layer 1” so rename it again to “bottle body” so we can better keep things organized. Open the layer style dialog, and select gradient overlay with these settings:
The gradient can be created like this:
This style would help display the bottle as a 3D object, adding realism to the design. Now we will add a drop shadow too, to help the bottle stand out of the background a little bit further. Make it with these settings:
3. Creating the highlights
Create a new layer and name it “body highlights left”. Ctrl + Click the bottle body to load it’s selection. Now go to Select > Modify > Contract and choose 15 pixels. Now fill the selection with any color you choose (press Alt + Backspace to fill it with the foreground color). While having the selection still active, contract it by 25 pixels. and press delete. Now grab the rectangular marquee tool and make a selection like this:
Now hit delete. You should end up with a symmetric shape. Select the right side of the symmetric shape, and hit delete again. Now select the rounded marquee tool, and move it until it fits here, and hit delete:
Now fix the irregularities using a brush with any color (preferably the same as the filling) until you get a good-looking curve. Now go to this layers blending options, and select fill opacity of 0%. Go to the gradient overlay, and set the gradient to go from white to transparent. At location 66% add another opacity slider, and set it to 20%. Now close the dialog. Grab the eraser brush and erase all the parts of the highlight, until you get a smooth curve, like this one (I used 74 pixel brush with 0% hardness):
Now create a new layer and name it “right highlight”. Now load the bottle body selection again (Ctrl + Click on the layer). Contract the selection by 10 pixels, and fill it with a color. Now contract it again, and hit delete. We don’t need the left part of the highlight so delete it. Now go to the layer blending options and set the fill opacity to 0%. Go to gradient overlay and select these settings:
The gradient can be created like this:
Now we need to create a left highlight on the head too. Create a new layer and name it “head highlight left”. Select the rectangular marquee tool, and make a selection like this:
Fill it with white. Deselect (Ctrl + D). Select the smudge tool, set the brush to 18 pixels (hardness 0%), and set strength to 75%. Now create another selection and fill with white to get this:
Now, use the eraser tool and smooth out the corners. Your design should now look like this. Keep trying and undoing until you got it right. All you have to do to complete the highlight is to apply to this highlight the same layer style as the one used on the left highlight, and drop the opacity of the layer to 80%. When you’re done, we can jump on to create the effect of a cap on the bottle (not the old-fashioned ones). Create a new layer and name it cap matt. Grab the eyedropper tool, and select a color from the middle of the bottle. Select part of the bottle head (using the rectangular marquee tool), and fill it with the color grabbed. now lower the opacity to 30% (can be more or less, depending on how much you want to point out the cap). This is an almost ready design. You’re done with the glass of the bottle. Now you can design a label for the bottle, and stick it beneath the highlight layers, above the bottle body layer. You can also decorate the cap with some ornaments like I did, and the label is fairly easy to create, just create some text, and warp it. You can also add a background, and using the elliptical marquee tool create the effect of bending. My result is:
Comments